If you’re looking for a way to make your personal brand, company or concept stand out with unique content, including captivating videos, without wasting too much time and money on editing, then this is the blog for you!

I really love creating content through photography and video, but don’t really call myself a professional photographer. I do however create custom content for brands and destinations and do private photoshoots and content creation coaching for entrepreneurs.
And because I am a visual and creative person this comes quite naturally to me!
I also enjoy creating dramatic, colorful, creative and fairy-tale like content for my own social media accounts, which helped accelerate their growth.

My Instagram accounts: @AuthenticChica and @ACTL_PR_Marketing currently have 200,000 followers combined, built up in the past 6,5 years. After which I founded my own company: Authentic Chic Travel and Lifestyle PR & Marketing almost 5,5 years ago.
Through these platforms I’ve helped more than 180 entrepreneurs and 100 companies, destinations and brands with their social media strategies, content creation, influencer marketing and custom campaigns.
You can find out more about my work and partners on this page or my company website.
But enough about me, let’s talk about how your content can stand out too!
Why is this important you might ask? Because the competition is huge! Social media keeps growing and has become an essential part of your marketing strategy, with Instagram as one of the most important players, with over 1 billion monthly active users worldwide!
On Instagram alone 1,074 photos are uploaded every second of the day!
That’s the playing field when you post, therefore if you want to get people’s attention, your post has to be scroll stopping. Most of us scroll until we see a photo, video, brand or person that we recognize, which generates an emotion and triggers us to stop, that is scroll stopping!
There are several ways to achieve this:
1. Share value & tips that are relevant to your target group
2. Choose a strong niche in which you specialize
3. Post brightly colored, pastel or moody pictures and stick to this specific style
4. Use video content with a strong trigger in the beginning
5. Get creative with editing effects and movement to create spectacular pictures and accessible videos easily
Although all of the above strategies are interesting to dive into, in this blog I will focus on the last technique. For this I can recommend 4 (mostly free) phone editing apps, which can easily help you achieve this on the go, with pics you already have!
Of course it's essential to batch content by doing some photoshoots, create focused content matching to your style, niche and target group, work with good photographers and use the right equipment. But it doesn't all have to be expensive or complicated! I myself create much of my content on the go with my Iphone X, which can also produce high quality pictures and video.
If you prepare what you want and find out what works for your account you can create good content anytime, anywhere, and edit to perfection afterwards.
So how to easily create the perfect pictures to make your account stand out? With focus & editing!

Next to the technical part of taking appealing and high quality pictures, editing can make all the difference! That’s why I always edit my pics before I use them, to enhance and consistently match them to my personal brand.
For basic editing you can use the tools in your phone's photo gallery, which even offers several preset filters.
I always take the following basic editing steps in my photo gallery first, to get the best out of each picture or video, by:
enhancing the brightness,
adjusting the contrast a bit
and sometimes adding or reducing the saturation and warmth, if the picture needs it, to match it to my gallery, but also keep it natural
Other great apps for picture editing are:
VSCO for nice filters to create a consistent style
Photoshop and Lightroom for editing, cloning, removal tools and creating your own preset filters, a.o.
For the same features I however find Snapseed and Facetune 2 easier to use
Lightleap for adding overlays, nice effects and custom skies
Motionleap for similar features as Lightleap, but with movement, to easily turn your pictures into spectacular videos
These last 4 are my favourite, which I use most to create scroll stopping content! Snapseed is totally free, Facetune 2 limits certain features for the free version and the other 2 are free the first weeks. After which Lightleap and Motionleap cost a few Euros a month, which is really worth it in my opinion.
In this blog I will show you 10 favourite pics of previous trips abroad and the Netherlands, so you can see the before and after difference.
All of them are edited to stand out, by being creative, colorful and fun. I do however also prefer to keep the look natural and life-like, therefore I usually don’t choose the fantasy filters.
This way you can see for yourself if the editing process was worth it and how many steps it took to create this content from existing pics, usually in just a few minutes:
1. Dutch Tulipfield colors

This is a tricky one and took me a few more editing steps than normal:
Photo gallery editing: enhanced brightness, colors and cropped the picture
Snapseed: used the removal brush to make the ground equal and remove the bags
Snapseed: used the pencil to remove shadow on me and increase brightness locally
Facetune 2: Filled up the blank spots in the right field by patching the flowers
Facetune 2: smoothed the clothing with the retouch> smooth tool
Motionleap: animated the skirt to add movement
Motionleap: added moving dusk sky
2. Aruba sunset
As you can see this one is much easier and took me only a few editing steps:
Photo gallery editing: enhanced warmth and cropped the picture
Facetune 2: smoothed the clothing and my arm with the retouch> smooth tool
Lightleap: added a pink sunset, but reduced saturation to make it less pink
3. Austria lake view

Editing steps:
Photo gallery editing: enhanced brightness, colors and added a filter
Snapseed: used the pencil to increase brightness locally and the color of the lake, flowers and my cape to make them pop
Motionleap: added the moving timelapse sunset sky
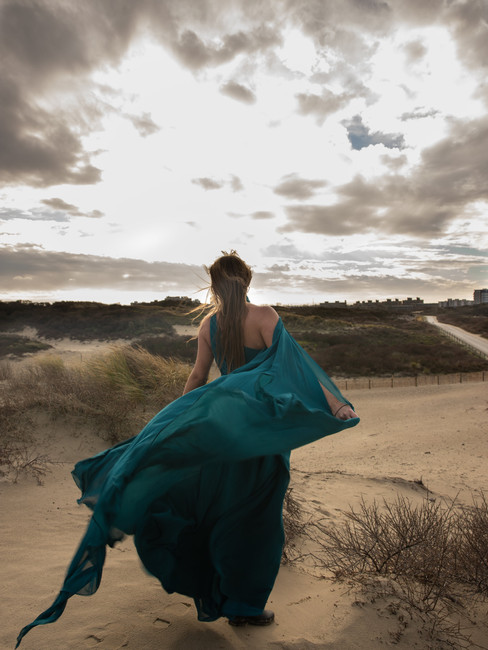
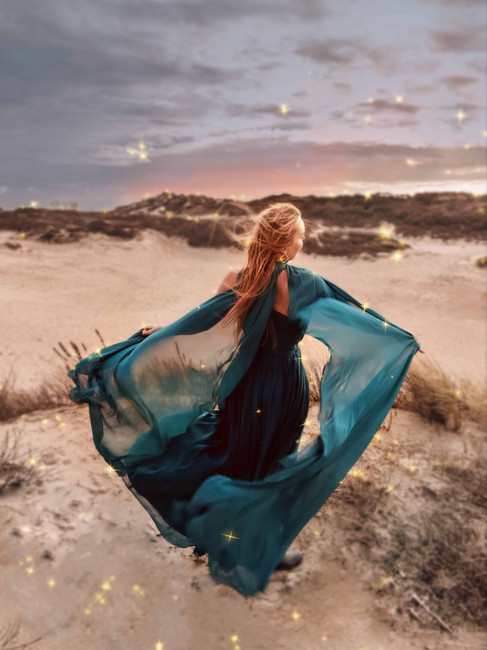
4. Dunes of the Hague - the Netherlands
Editing steps:
Although this is not exactly the same picture, it was taken at the same spot and clearly shows that the angle of the camera makes all the difference. By removing distractions like the road and taking it from a higher angle you create a more captivating image
Snapseed: used the removal brush to make the ground equal and remove the footsteps
Snapseed: used the pencil to remove shadows on me and increase brightness locally
Facetune 2: enhanced the color of the dress with the retouch> vibrance tool
Facetune 2: smoothed the clothing with the retouch> smooth tool
Lightleap: added a subtle sunset sky
Lightleap: used a blur filter to get more focus on me
Lightleap: added sparkles locally
5. Scheveningen Beach - the Netherlands

This is also a tricky one and took me more editing steps than normal to remove the chair and arch the feet:
Photo gallery editing: enhanced brightness, warmth and cropped the picture
Snapseed: used the removal brush to remove the chair by zooming in a lot
Snapseed: used the pencil to enhance brightness locally, especially my dress, the sand and reflection
Facetune 2: enhanced the color of the dress with the retouch> vibrance tool
Facetune 2: Arched the feet by using the patch tool
Motionleap: added moving water
Motionleap: added a moving stormy sky
6. South Swedish castle
Editing steps:
Photo gallery editing: enhanced brightness, warmth and tilted the picture
Snapseed: used the pencil to enhance brightness locally, especially my clothes, the grass and building to make it look more fresh
Lightleap: added a more interesting cloudy sky, as it was a very gloomy day
7. Lago di Como boat trip - Italy

Editing steps:
Photo gallery editing: added a darker dramatic filter for vintage feel
Motionleap: animated the water to add movement
Motionleap: added a moving sky called essential, but reduced darkness and horizon
8. Jardins d'Etretat - France
Editing steps:
Photo gallery editing: added a darker dramatic filter for vintage feel
Snapseed: used the pencil to enhance brightness locally, especially my skirt to make it pop
Lightleap: added a stormy sky for dramatic effect
Lightleap: added grunge effect overlay
Lightleap: and added lightning elements
9. Lago di Braies - Dolomites Italy

Editing steps:
Photo gallery editing: enhanced brightness, colors and added a filter
Snapseed: used the pencil to increase brightness locally of the lake, my skirt and reflection to make them pop
Motionleap: added moving water effect
Motionleap: added a moving sunset
Motionleap: added a sunflare element at the top of the mountain
10. Xmas magic in Strasbourg - France

Editing steps:
Photo gallery editing: enhanced brightness and warmth
Snapseed: used the pencil to increase brightness locally and enhance sunset color in the back
Motionleap: added the glowing element over the lights in my hands to cover the strings
Motionleap: added moving shimmer overlay
As you can see it's all about testing different apps, features and having fun with it! That's how you eventually find the best combinations and can create magical / spectacular content easily from existing pictures.
For a visual explanation of the exact steps to edit like this, you can also check out my social media accounts and these Instagram Reels:
And for more Instagram photography & content creation tips you can check these blogs:
But of course I’m also happy to help you personally by requesting a private strategy consult or content creation coaching for your concept!
Feel free to contact me here or via contact@authenticchica.com, if you think we’re the right match.


留言